こんにちは、初投稿の大橋と申します。
今回は社内で行った技術研修で取り上げたネタをご紹介させていただこうと思います。
概要
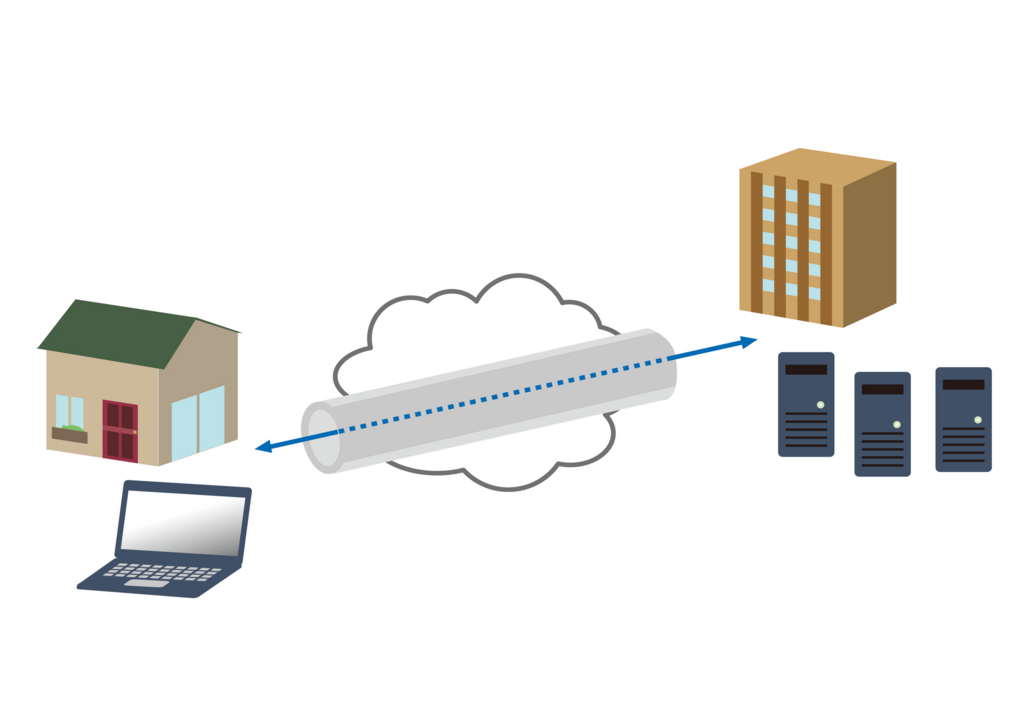
タイトルほぼそのままなのですが、EC2環境に SoftEther VPN をインストールし VPN を構築して iPhone で接続テストまでを行いました。
実は iOS 特有のバグに引っかかり Apple に問い合わせを行うハメになりましたが、まずはサーバ側の作業から順にご紹介します。
環境
<サーバ側>
- EC2 t2.micro Amazon Linux
- SoftEther VPN
- ネットワーク
- Elastic IPを1つ用意
- セキュリティ
- SSH(TCP:22について任意のIPを許可)
- L2TPで用いるUDP:500/UDP:4500を許可
<クライアント側>
- 今回は iPhone を利用
全て root で行います。
ソースを落として make していきます。
$ sudo su -

# id
uid=0(root) gid=0(root) groups=0(root)

# yum install -y gcc
・・・
Complete!

# ls -ld work || mkdir work && ls -ld work
ls: cannot access work: No such file or directory
drwxr-xr-x 2 root root 4096 XXX XX XX:XX work

# cd work && pwd
/root/work

# wget http://jp.softether-download.com/files/softether/v4.22-9634-beta-2016.11.27-tree/Linux/SoftEther_VPN_Server/64bit_-_Intel_x64_or_AMD64/softether-vpnserver-v4.22-9634-beta-2016.11.27-linux-x64-64bit.tar.gz
# tar xvfz softether-vpnserver-v4.22-9634-beta-2016.11.27-linux-x64-64bit.tar.gz
# cd vpnserver && pwd
/root/work/vpnserver

※makeを入力したら、ライセンスに同意するか等何度か問われるので、全て「1」を入力する。
# make
・・・
Do you want to read the License Agreement for this software ?

 1. Yes
 2. No
・・・

make[1]: Leaving directory `/root/work/vpnserver‘

# cd ~/work && pwd
/root/work

# mv vpnserver /usr/local/
# cd /usr/local/vpnserver/ && pwd
/usr/local/vpnserver
# chmod 600 *
# chmod 700 vpncmd
# chmod 700 vpnserver
make 時にチェックも問題ないことを確認したので、起動スクリプトを準備します。
/etc/init.d/vpnserver を以下の内容で作成します。
DAEMON=/usr/local/vpnserver/vpnserver
LOCK=/var/lock/subsys/vpnserver
test -x $DAEMON || exit 0
case "$1" in
start)
$DAEMON start
touch $LOCK
;;
stop)
$DAEMON stop
rm $LOCK
;;
restart)
$DAEMON stop
sleep 3
$DAEMON start
;;
*)
echo "Usage: $0 {start|stop|restart}"
exit 1
esac
exit 0
続いて自動起動設定を行い、VPN Serverを起動します。
# chmod 755 /etc/init.d/vpnserver
# /sbin/chkconfig --add vpnserver
# /sbin/chkconfig | grep vpnserver
vpnserver       0:off   1:off   2:on    3:on    4:on    5:on    6:off
※initレベル「2345」でonになっていることを確認します。

※VPN Serverを起動します。
# service vpnserver start
The SoftEther VPN Server service has been started.

※プロセスを確認します。
# ps -ef| grep vpn | grep -v grep
root      XXXX     1  X XXXXX ?        XX:XX:XX /usr/local/vpnserver/vpnserver execsvc
root      XXXX  XXXX  X XXXXX ?        XX:XX:XX /usr/local/vpnserver/vpnserver execsvc
それでは vpncmd を利用して構築を行います。
# pwd
/usr/local/vpnserver

※VPN Serverの構築のため1を選択します。
# ./vpncmd
vpncmd command - SoftEther VPN Command Line Management Utility
SoftEther VPN Command Line Management Utility (vpncmd command)
Version 4.22 Build 9634   (English)
Compiled 2016/11/27 15:23:56 by yagi at pc30
Copyright (c) SoftEther VPN Project. All Rights Reserved.

By using vpncmd program, the following can be achieved.

1. Management of VPN Server or VPN Bridge
2. Management of VPN Client
3. Use of VPN Tools (certificate creation and Network Traffic Speed Test Tool)

Select 1, 2 or 3: 1

※IPアドレスとHUBの名前を問われますが、Enterのみを押下します。
Specify the host name or IP address of the computer that the destination VPN Server or VPN Bridge is operating on.
By specifying according to the format 'host name:port number', you can also specify the port number.
(When the port number is unspecified, 443 is used.)
If nothing is input and the Enter key is pressed, the connection will be made to the port number 8888 of localhost (this computer).
Hostname of IP Address of Destination:

If connecting to the server by Virtual Hub Admin Mode, please input the Virtual Hub name.
If connecting by server admin mode, please press Enter without inputting anything.
Specify Virtual Hub Name:
Connection has been established with VPN Server "localhost" (port 443).

You have administrator privileges for the entire VPN Server.

VPN Server>
HUBを作成します。最初からDEFAULTが存在しますが、任意の名前を付けたHUBを用意します。
VPN Server>HubList
HubList command - Get List of Virtual Hubs
Item              |Value
------------------+-------------------
Virtual Hub Name  |DEFAULT
Status            |Online
Type              |Standalone
Users             |0
Groups            |0
Sessions          |0
MAC Tables        |0
IP Tables         |0
Num Logins        |0
Last Login        |XXXX-XX-XX XX:XX:XX
Last Communication|XXXX-XX-XX XX:XX:XX
Transfer Bytes    |0
Transfer Packets  |0
The command completed successfully.

※den_hubという名称でHUBを作成します。パスワードが必要なので、ランダム生成したものを覚えておく必要があります。
※参考
perl -e '@c = (ord("!") .. ord("~")); for (1..12) {print chr($c[rand() * @c]);}'

VPN Server>HubCreate
HubCreate command - Create New Virtual Hub
Name of Virtual Hub to be created: den_hub

Please enter the password. To cancel press the Ctrl+D key.

Password: **********
Confirm input: **********

The command completed successfully.

※続けて、DEFAULTを削除します。
VPN Server>HubDelete
HubDelete command - Delete Virtual Hub
Name of Virtual Hub to delete: DEFAULT

The command completed successfully.

※den_hubのみになったかを確認します。
VPN Server>HubList
HubList command - Get List of Virtual Hubs
Item              |Value
------------------+-------------------
Virtual Hub Name  |den_hub
Status            |Online
Type              |Standalone
Users             |0
Groups            |0
Sessions          |0
MAC Tables        |0
IP Tables         |0
Num Logins        |0
Last Login        |XXXX-XX-XX XX:XX:XX
Last Communication|XXXX-XX-XX XX:XX:XX
Transfer Bytes    |0
Transfer Packets  |0
The command completed successfully.

※この後の設定の為に、作成したHubを指定します。
VPN Server>Hub den_hub
Hub command - Select Virtual Hub to Manage
The Virtual Hub "den_hub" has been selected.
The command completed successfully.

VPN Server/den_hub>
ユーザを作成し、パスワードを設定していきます。
VPN Server/den_hub>UserList
UserList command - Get List of Users
Item|Value
----+-----
The command completed successfully.

VPN Server/den_hub>UserCreate
UserCreate command - Create User

User Name: ohashi
Assigned Group Name:
User Full Name:
User Description:
The command completed successfully.

VPN Server/den_hub>UserList
UserList command - Get List of Users
Item            |Value
----------------+-----------------------
User Name       |ohashi
Full Name       |
Group Name      |-
Description     |
Auth Method     |Password Authentication
Num Logins      |0
Last Login      |(None)
Expiration Date |No Expiration
Transfer Bytes  |0
Transfer Packets|0
The command completed successfully.

※パスワードの設定
VPN Server/den_hub>UserPasswordSet
UserPasswordSet command - Set Password Authentication for User Auth Type and Set Password
User Name: ohashi

Please enter the password. To cancel press the Ctrl+D key.

Password: **********
Confirm input: **********

The command completed successfully.

VPN Server/den_hub>
ここまでくればあと一息です。
踏み台として利用するために IPsecEnable、SecureNatEnable、NatEnable、DHCPEnable を設定します。
VPN Server/den_hub>IPsecEnable
IPsecEnable command - Enable or Disable IPsec VPN Server Function
Enable L2TP over IPsec Server Function (yes / no): yes

Enable Raw L2TP Server Function (yes / no): no

Enable EtherIP / L2TPv3 over IPsec Server Function (yes / no): no

Pre Shared Key for IPsec (Recommended: 9 letters at maximum): XXXXXXXXXXXX

Default Virtual HUB in a case of omitting the HUB on the Username: den_hub

The command completed successfully.

VPN Server/den_hub>SecureNatEnable
SecureNatEnable command - Enable the Virtual NAT and DHCP Server Function (SecureNat Function)
The command completed successfully.

VPN Server/den_hub>NatEnable
NatEnable command - Enable Virtual NAT Function of SecureNAT Function
The command completed successfully.

VPN Server/den_hub>DHCPEnable
DhcpEnable command - Enable Virtual DHCP Server Function of SecureNAT Function
The command completed successfully.

※一通りの設定が終わったので、vpncmdから抜けます。
VPN Server/den_hub>exit
クライアントの設定
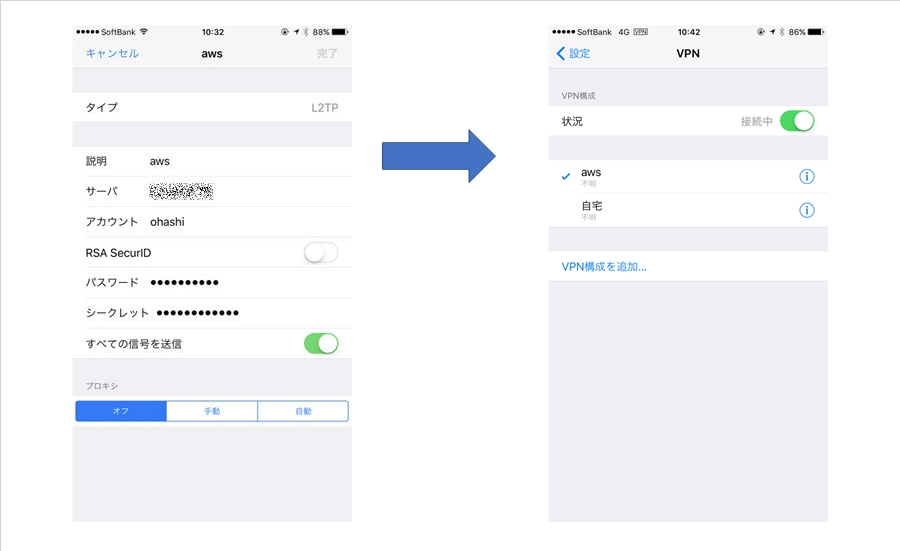
さて、それでは iPhone から接続してみましょう。
以下のような感じで設定してみてください。

Android の場合は、L2TPのPSKを利用してください。
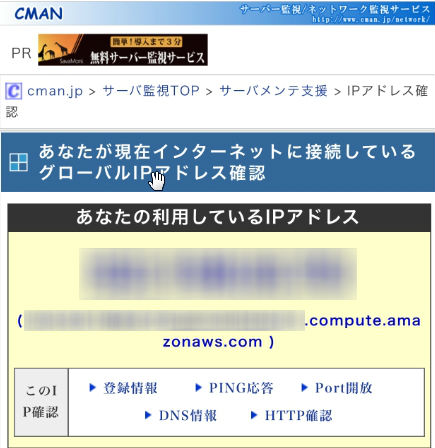
正常に接続できているかどうかは、IPアドレスの確認サイトを閲覧することで確認が出来ます。
www.cman.jp
以下のように、接続先のサーバのグローバルIPアドレスが表示されればOKです。

注意点
今回一番想定外だったのが、IPsecの事前共有キーに関してです。
なんと iOS のみ「"」がキーに含まれると認証エラーになりました。
Windows、MacOS、Android ではこの事象は発生しませんでした。
Apple に問い合わせたところ「現行の iOS 10.3.3 及び現行開発中の iOS 11 でも同事象は発生するが、対応の予定は無い」との事でした。
と言うわけで、皆さんもVPNを構築する際はお気をつけ下さい。
書いた人:テレコム第2チーム 大橋


